

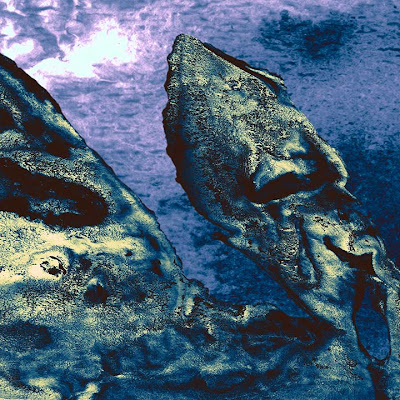
Getting the eyes right really helped. Before it seemed as if the creature was watching the viewer and is just seemed wrong. Now it's watching the moon and the helpless expression on its face works properly.
I also changed this from a RGB file to a LAB file, then used a Curves adjustment layer to mess with the color of the whole piece at the same time. In the initial version I worked hard to give a sense that the scene was being viewed in a particular light; the end result was a bit muddy. This made the colors brighter and helped define the shapes, which also increased the sense of depth. I need to spend more time messing with LAB and other modes...

I see a couple of cliff faces in this.
In a comment on the last Moonwatch post, Peter Bond asked how I created the images. Well, if I haven't gone into this before, here's the deal.
This print is part of a series called Rorschach Dreams. (Here's the first image in the series; here's the second.) Like the earlier Bonelands series, it's intended to provide me with images of creatures and landscapes for use in my novel-in-progress. But instead of starting with preconcieved images and then executing them by compositing photographs and scans of physical objects, which was my technique for the Bonelands, I'm using inkblots.
I start off by going through a stack of blots I've created over the years until I find an image that looks like some kind of concrete object to me. I first started using inkblots about twenty years ago when a design teacher suggested I do this as a source of visual inspiration. I used to trace blots in pen and ink or paint over them using whiteout and ink. Once I started in on Photoshop I realized that I could manipulate the blots seamlessly.

I kind of assume that if I ever have to take a real Rorschach test they'll lock my ass up but pronto. Maybe that should be my tattoo -- "Born To Scare Shrinks."
And in this image I saw a creature -- the eyes and mouth jumped out at me and then I saw the rest of its outline.
Then I scan the blots, cut out the images in Photoshop, and composite them in a seperate file. By using the blots I'm able to get all kinds of crazy detail that I'd never come up with on my own.

Once I've got a finished grayscale image, I color it by using a combination of Gradient Maps and overlays using a variety of blending modes. Gradient Maps take grayscale images and turn them into color images modeled after gradients -- white being one end of the gradient, black the other. The gradients I used here were pretty involved, using four or five different colors carefully modulated to produce the effects that I wanted. Finally, each element is treated using anywhere from one to five different adjustment layers to get the hues and tonalities just right.
As I mentioned above, in this particular image I finished off by converting it to a flattened image in LAB mode, a type of file used by photographers to achieve fine adjustments to the overall color relationships in an image. It's the first time I've used it on my own work; I suspect it's gonna be something I do a lot in the future.
Hmm. If this kind of thing is of interest to people maybe I should figure out how to do screen captures and so on so as to be able to do a real step-by-step tutorial.

Hmm. If this kind of thing is of interest to people maybe I should figure out how to do screen captures and so on so as to be able to do a real step-by-step tutorial.
No comments:
Post a Comment